![]()
![]()
![]()
A NURB surface is defined by a rectangular-like grid of control points organized into a number of "rows" and "columns". The defining points are located at the intersections of the rows and columns and can be located anywhere in space. For shaping and fairing purposes, however, you need to try and maintain a "nice" spacing for the rows and columns. When you use the "Surf-Add Surf" command, you are prompted to enter the initial four corner points of a two row and two column surface. Since you can control the shape of the surface only at the defining points, you need to add in more rows or columns to the surface for more complicated shapes.
You cannot add individual defining points to a surface, you can only add complete rows or columns. This is an absolute requirement for all (rectangular) B-spline surfaces. As you might expect, if you want more control points to better define a small portion of a surface, you need to add rows and columns which extend over the entire length and width of the surface. This means that you then have to deal with the extra shape control of these added rows and columns at the other end of the surface. Ugh!
[Aside: Just because you see a lot of pretty, shaded pictures of 3D CAD models dosen't mean that it was easy to create the 3D model, or that there weren't a lot of fundamental, mathematical limitations imposed on the user. (Remember: rendering and shading is simple; 3D modeling is difficult.) There is nothing more flexible than a pencil, a piece of paper, and the human mind. As soon as you start using the computer for design, you are forced to adapt to the limitations and idiosyncracies of the program's underlying mathematics and the program's user interface. Of course, you will get a lot in return: speed, automatic matching of stations, waterlines, and buttocks, full calculations, full-size templates, etc.]
In our old, DOS version of ProSurf and ProBasic, we tried to keep the rows of all surfaces oriented longitudinally, and all of the columns oriented vertically or transversely. By definition, it doesn't really matter which way the rows and columns are oriented, we just tried to make it easier to identify certain lines of a surface. Since the new Windows versions try to be more general-purpose (less specific to boats), it was necessary to eliminate the distinction between surface rows and columns. That is why you will often see something like "Row/Col" in a command or in the manual. Internally, the program knows which are the rows and which are the columns, but the user shouldn't have to be bothered by all of that. Therefore, you should look at the lines that make up the surface as either rows or columns (Row/Col).
The next step of this tutorial is to add a (row/col) to the "power23" model. Follow these steps:
o Display the profile view of the hull.
o Select the "Surf-Add Row/Col-Add Row/Col VertFix" command. (this just turns on the command)
o Position the cursor near the point shown by the arrow in the picture below
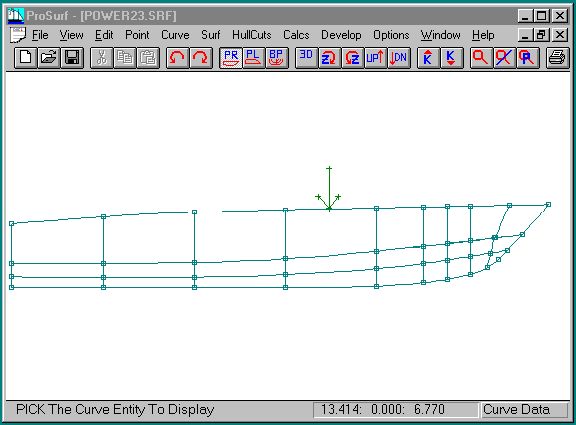
o Click the left mouse button. The program will add a new (row/col) at that location in all of the surfaces. If something went wrong, you can always use the undo command and start over.
The program finds the row or col position closest to the picked point and inserts a row/col at that location. Notice that the arrow position is located approximately half way between the two surrounding row/cols. It is always a good idea to add in row/cols halfway between any two existing row/cols. This may mean that you will end up with more row/cols than you think you need, but in the end, it will make the shaping and fairing process easier. The smoothness of a NURB surface is greatly influenced by the spacing of the rows and columns. The more unevenly spaced they are, the more bumps and wiggles you will have in the surface. In general, you should keep the consecutive spacing of the rows and columns to a ratio of less than 2::1.
Also note that the program inserted the row/col as being fixed in a vertical plane for the profile view. This means that none of the points can move back and forth in the 'X' direction (longitudinally) and it means the the added row/col is equivalent to a station at that point. Normally, B-spline points can be located anywhere in space, but for practical purposes and for ease of use, we suggest that these row/cols be fixed in the transverse plane. This can't always be done, however, since up near the bow (and for some boats, near the stern), the row/cols must begin to "angle over" to make a transition in shape from amidships to the bow (or to the stern). If you do not make this transition, then the boat will be more difficult to shape and fair. Remember that for B-spline surfaces, the rows and columns should be spaced as evenly as possible.
The overall rules for adding row/cols can be summed up as follows:
1. Evenly space (as much as possible) all rows and columns. Do this by inserting all new row/cols halfway between two existing row/cols. It will be easier to shape and fair the boat. You may end up with extra row/cols, but the boat will be more fair.
2. Add all new row/col in the amidships area as vertically fixed in profile view. These are the row/cols that will be equivalent to stations. (You can always "un-fix" the row/cols later, if you wish.)
3. Near the ends of the boat, add the new row/cols as "angled" (not fixed) (this is the "Surf-Add Row/Col-Add Row/Col Angle" command), so that you can begin to make the transition from the vertically fixed "station-row/cols" to the angled row/col at the bow and stern.
4. Always reshape the boat (with the "Edit-Move Point" command after adding 1-3 new row/cols. If you add in a lot of rows and columns first, before shaping the boat, then the shaping task will become more tedious. You can wait until the end to do the detailed fairing (with the Move Point% and Ooch Point commands), but use the "Edit-Move Point" command along the way.
So far you have seen how to add more shape to a boat (Add Row/Col) and you have seen how to change the shape of a boat (Move Point). These are the basic tools for modeling your boat.